Grape Pie Supreme

Grape Pie Supreme

A Recipe from Good Housekeeping’s Complete Christmas Cookbook (1967)

About the Recipe

It’s almost Christmas, and the hubs requested something festive for his office holiday party. As I was browsing my books, this recipe grabbed my eye. I couldn’t stop thinking about it. The grapes. The glaceed cherries. The mid-century of it all! So of course I decided to give it a try.

Reader – it was delicious. The almond gives it a slight marzipan taste, but it’s so well balanced between sweet and savory. I used crisp autumn grapes which, while huge, were big bursts of flavor. And it was one of those wonderful dishes that’s better out of the fridge on day 2. It was gone by day 4 (and not because we brought it to share anywhere.)

Only a few quick notes on this one:

  • While the grapes were delicious, a smaller, sweeter red grape would probably suit this dish a little better.
  • A pre-made crust will do just fine. If you do make your own crust, let it sit in the fridge for a few hours if not overnight. This will allow the butter to firm up a little more to give you flaky layers. It also allows the flour to fully hydrate, which makes the dough easier to handle.
  • Separate your eggs while they’re cold, then let them come to room temp before you use them. The whites will hold their structure much more effectively.
  • If you can get your hands on red and greed cherries instead of just red – do it. Take the plunge and go all out on Christmasing up this delightful pie.

If you’re wondering about the decorations and how to lay them out, take a peek at the video below.

About the book

Another year of Good Housekeeping’s set of cookbooks. This 1967 set comes in a lovely hard-sided holder for all 13 different books. I was lucky enough to be gifted these a few years ago and I love to cook out of them. There’s a great range of quick and simple to dishes that test your skill. I’ve yet to try one I didn’t like out of this set.

The Recipe!

Ingredients:

6 T butter (cold from the fridge)
1 cup flour
2 T ice cold water
2 1/2 cups seedless grapes
1/4 cup butter, softened
1/2 cup sugar, separated
3 eggs, separated
2 t grated lemon peel
1 T lemon juice
4 1/2 oz blanched almonds, ground
Red glaceed cherries (optional)
Whole blanched almonds (optional)

Directions:

Early on day:
1. With pastry blender or 2 knives, cut 6 tablespoons butter into flour until like coarse corn meal; add 2 tablespoons water and toss quickly together, forming a smooth ball. (Blogger’s note: wrap the dough in plastic wrap and chill for at least 2 hours before the next step)

2. Roll out pastry; use to line 9-inch pie plate, making fluted edge. (Or use 11-inch flan pan with removeable bottom, trimming pastry even with edge.) On bottom of pastry place grapes.

3. Start heating oven to 350*F

4. In medium bowl, with mixer at medium speed, beat 1/4 cup butter with 1/4 cup sugar until creamy. Now beat in egg yolks, one at a time, then lemon peel and juice and ground almonds.

5. Beat egg whites until peaks form; gradually add 1/4 cup sugar, beating until stiff. Carefully fold into almond mixture; pour over grapes. 

6. Bake 40-45 minutes, or until top is firm and a dark golden. Let cool on wire rack.

Just before serving:
Decorate top of pie with glaceed cherries and whole almonds if desired. Makes 8 servings.

The Video!

A quick video of this gem just before I served it. Christmas-y goodness.

Lemon-Cream Loaf

Lemon-Cream Loaf

A Recipe from The Pillsbury Family Cook Book (1963)

About the Recipe

It’s (I bought too many) lemon(s) week in my household, so we’re making a lemon cake! I wanted something that would have a little bit of mid-century flair, but come out delicious enough to share. And wow oh wow – did this take the cake. (Pun intended).

A few quick notes to make sure yours comes out well:

  • Don’t just grease your pans. Give them a butter and flour layer to make sure they come out. They’re a little bit sticky all around and that extra flour will make sure they come out of the pans.
  • I made a simple syrup out of the lemon juice and sugar at the end. Put them in a small saucepan on a low heat and stir continuously until the sugar is dissolved.
  • Painting the glaze on made the tops sticky and moist and lovely. 10/10 don’t miss out on that step.

The result here was a crumbly, fluffy lemon cake. Both loaves were gone within two days after sharing with some friends. Heed the note about freezing the second loaf, but I’d be surprised if you manage to hold on to it for that long.

About the book

I found this book in a small antique store just outside of Joshua Tree. My friends and I were headed out to a dessert adventure to look at the stars. The hubs and I requested a quick stop in this tiny town to wander and look at the shops. I’m so glad that we made the stop.

This book is so cute. Each design choice feels very carefully made and curated for the mid-century kitchen. A perfect little time capsule of hosting in the ’60’s. Enjoy!

The Recipe!

Ingredients:
2 1/4 cups sifted all purpose flour
1 T baking powder
1 t salt
1 2/3 cups sugar, split
1/2 cup shortening
2 eggs
1 cup milk
8-ounce package cream cheese, cut into 1/4-inch cubes, softened
1/2 cup chopped walnuts
2 T grated lemon rind 
1/4 cup lemon juice

Directions:

Grease and flour two 9 x 5 x 3-inch pans. Sift flour with baking powder and salt. Gradually add 1 1/3 cups sugar to shortening in large mixing bowl; cream at high speed of mixer until light and fluffy.

At medium speed blend in eggs, beating well. At low speed add sifted dry ingredients alternately with milk, beginning and ending with dry ingredients. Blend well after each addition. 

Fold in cream cheese, walnuts and lemon rind. Pour batter into pans.

Bake at 375*F for 50 to 55 minutes, until golden brown.

Combine 1/3 cup sugar and lemon juice (hint from Andi: heat this mixture over low heat, stirring constantly until the sugar is dissolved); brush mixture over hot loaves. Cool 30 minutes. Remove from pans. Cool completely before slicing.

TIP: Freeze the second cake in meal-size amounts for a quick dessert. Lemon Cream Loaf is good as a base for Baked Alaska.

Lemon Meringue Pie

Lemon Meringue Pie

A Recipe from Pyrex Prize Recipes (1953)

About the Recipe

I have a confession to make: This was my first lemon meringue pie. I know! Crazy! But when two of my best friends requested one for their birthday, how could I refuse? And this – this is an amazing pie. Plus, I had exactly the prescribed pie plate in my Pyrex collection.

The part I found the most challenging was actually adding the meringue to the top of the pie. If you do it right and get your nice, glossy, stiff peaks, it’s incredibly hard to spread. I’ll probably pipe it in the future, just to make it a little easier. Though I do love the rustic look that came out of just plopping it on and filling in gaps.

A few quick tips to help your pie come out as beautifully as mine did:

  • Separate your eggs when they’re cold, then let them come to room temperature. It will help to keep your yolks from scrambling when you’re making the custard, and it will make a more successful meringue.
  • I added just a touch (maybe half or quarter of a teaspoon) of cream of tartar to my meringue to help it to hold its structure.
  • Take your time. No really – take your time. When you’re cooking the flour, sugar, and water it may take more than 12 minutes. It’s okay. Wait until it gets really nice and thick or your custard won’t set. Make sure you’re scraping the bottom. I used a spoon, but a rubber, heat-resistant spatula will work well for this.
  • Do your mise en place for this one. You’ll need ingredients quickly, and will not be able to walk away from stirring your custard to grab something.

Lemon meringue pies can be daunting. I get it. But it give it a whirl! There’s nothing like meeting a baking challenge and enjoying the fruits (or lemons!) of your labor.

About the book

I love this little book. It’s a little love story for anyone who has these beautiful pieces of glassware in their home. Each recipe recommends a specific dish to use to make sure your recipe comes out perfectly. It makes good use of everything from the coffee pots to the Flameware to the little Flamingo Pie Plate I got to use for this pie. Enjoy a little bit more of the goodness from Pyrex Prize Recipes:

The Recipe!

Ingredients:
FILLING:
2/3 cup flour
1 1/4 cups sugar
1/2 t salt
2 1/4 cups cold water
3 egg yolks
1 T butter
1 T grated lemon rind
1/3 cup lemon juice

MERINGUE:
3 egg whites
1/2 t salt
6 T sugar

Directions:

Prepare baked pie shell according to directions in your favorite recipe or pre-made crust in PYREX 8 1/2-inch Pie Plate #909

  1. Filling. Mix flour, sugar, and salt together in a PYREX Flameware Saucepan. Blend with the cold water. Cook over low direct heat until thick, stirring constantly, about 10 to 12 minutes. 
  2. Blend a little of this hot filling mixture with slightly beaten egg yolks. Combine with filling remaining in Saucepan. Cook 2 minutes longer over low direct heat, stirring constantly. Add butter.
  3. Remove from heat and add lemon rind and lemon juice. Cool about 5 minutes. Pour into cool baked pie shell. 
  4. Meringue. Beat egg whites with salt until foamy. Add sugar, a tablespoon at a time, beating continually, until meringue stands in firm peaks. 
  5. Spread meringue over warm pie filling, making sure the meringue touches crust all the way around to prevent shrinkage. Bake.

Time: bake meringue-topped pie 8-10 minutes
Temperature: 400*F hot oven
Amount: 6-8 servings
Dish: PYREX 8 1/2-inch Pie Plate #909 or #209

Applesauce Gems

Applesauce Gems

A Recipe from The Art of Making Good Cookies Plain and Fancy (1963)

About the Recipe

Are you drowning in apples from a beautiful day apple picking? Are you looking for the perfect autumn cookie to bring to your next bake sale? Do you have little patience for complex cookie recipes? Have I got a cookie for you.

This was a super simple, and wonderfully delicious recipe. And turns out – it’s totally vegan and allergen free!

A few quick notes to ensure that these come out great:

  • I decided to make a quick applesauce when I had an abundance of apples and none in my pantry. If you decide to do the same (highly recommended), use a flavorful apple (honeycrisp, pink lady, a mix of red delicious and granny smith if you must go basic), a pinch of salt, and about a tablespoon of sugar. There’s a ton of flavor that will come from the rest of the cookie, and you can always add additional spice to your sauce later.
  • I used a tablespoon sized cookie scoop and got almost exactly 5 dozen cookies.
  • I went with mixed raisins for this one, but I can definitely see how some candied orange peel or even currants or craisins would have done well in this recipe.
  • As always, substituting softened butter for your shortening will do fine in this recipe. Use a 1:1 ratio.
  • Substituting a pie spice mix for the same amount of nutmeg and cinnamon (2 teaspoons total) will add some richness and variation.

As this book notes, this is a fairly plain, but utterly delicious cookie. Well worth the bake this time of year.

About the book

This is a brand new book to my library, and gosh I just can’t wait to dig into it again. It’s literally a mid-century cookie primer. It has some truly interesting and different recipes. And I love all of the little diagrams, tips, and tricks designed to help an amateur baker make a successful cookie. I’ll share more when this book comes back around.

The Recipe!

Ingredients:

1 cup shortening
2 cups brown sugar, firmly packed
1/2 cup cold coffee
1 cup applesauce
3 1/2 cups all-purpose flour
1/2 t baking soda
1 t baking soda
1 t salt
1 t nutmeg
1 t cinnamon
1 cup light seedless raisins or candied diced fruit
1 cup currants or dark seedless raisins

Directions:

Cream shortening and sugar well. Add coffee and applesauce. Sift together dry ingredients and blend in, adding fruits last. Bake on lightly greased baking sheet at 375*F about 10 minutes (I baked mine for about 13) To keep soft, store in airtight container. 5 dozen

German Sweet Chocolate Cake

German Sweet Chocolate Cake

A Recipe from Florence Jones’ Recipe Box (19??)

About the Recipe

There are a few core memories that pop up when I think about going to Grandma in Washington’s house growing up. There are the walls covered with family photographs. There are the artifacts from her travels all over the world. But more than almost anything else, there’s German Chocolate Cake.

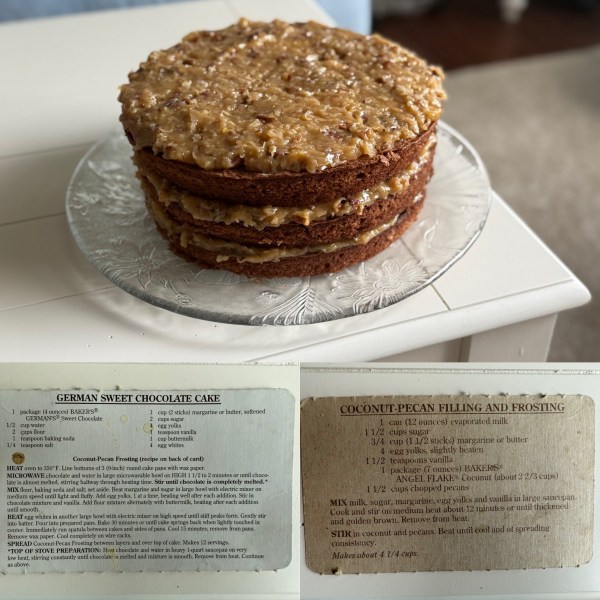
Every time we had a family celebration or holiday, especially one that had to do with my father, my grandma made a German Chocolate Cake. She made hers with two layers. Take a minute and check out the recipe. 3 layers. There are 3 layers in that recipe. We endlessly gave her a hard time about it. She laughed it off with her usual “oh, shit!” knowing that we were going to love the cake no matter the number of layers.

Indeed, this was the cake that she was best known for. In all the years that she made it, I kept asking for the recipe. Her answer was always no. “It came off the back of the box, Andi! It’s nothing special.”

My grandma passed away on September 14, 2025 at the age of 94. A few years ago, she gifted me her recipe boxes and her cookbooks, as well as most of her pans. When I received the news of her passing, the first thing I wanted to do was bake this cake. I found the recipe card stuffed in one of her recipe boxes. And y’know – it was right off the back of the box!

This cake is a labor of love. It’s a little bit tricky, and the icing takes an awfully long time to get just right, but it’s worth it.

Some tips from my time making it and all the years of Grandma serving it:

  • The layers freeze exceptionally well. She always had a few spare layers and frosting waiting in the freezer. Let everything thaw in the refrigerator overnight, and you’re good to go.
  • The icing takes awhile to get just right. I stirred for about 25 minutes until I got the right color and thickness.
  • For your eggs: Separate them when they’re cold, then let them come to room temperature before baking.
  • I used butter; Grandma used margarine (so that the cake is kosher pareve). Both work.
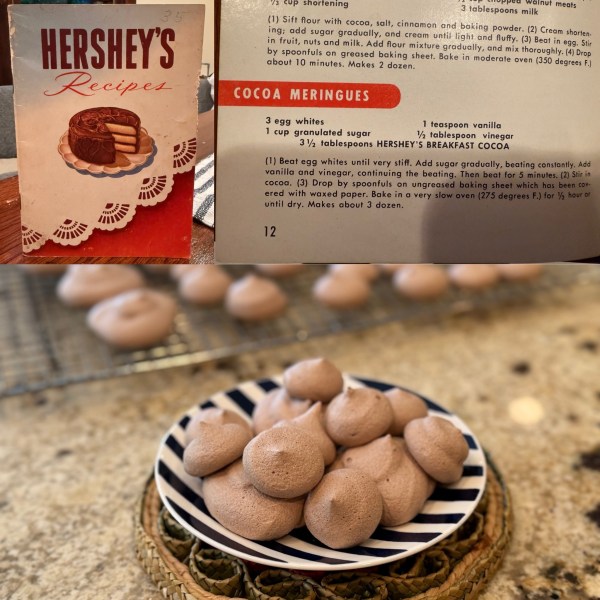
  • There are enough egg whites leftover from the icing to make a delicious meringue.
  • Always double the icing. A thick layer in the cake serves well, and people always want to nibble the extra.

For more recipes from my family recipe box, check out my Recipes from Grandma page.

About the book

A quick note to say that the recipe on the back of the current Baker’s German Chocolate is slightly different than this one. I didn’t try that one, so I can’t speak to it.

The Recipe!

Ingredients:

1 package (4 ounces) Baker’s German’s Sweet Chocolate
1/2 cup water
2 cups flour
1 t baking soda
1/4 t salt
1 cup (2 sticks) margarine or butter, softened
2 cups sugar
4 egg yolks
1 t vanilla
2 cup buttermilk
4 egg whites

COCONUT-PECAN FILLING AND FROSTING:
1 can (12 ounces) evaporated milk
1 1/2 cups sugar
3/4 cup (1 1/2 sticks) margarine or butter
4 egg yolks, slightly beaten
1 1/2 t vanilla
1 package (7 ounces) Baker’s Angel Flake Coconut (about 2 2/3 cups)
1 1/2 cups chopped pecans

Directions:

Heat oven to 350*F. Line bottoms of 3 9-inch round cake pans with wax or parchment paper.

Heat chocolate and water in heavy 1-quart saucepan on very low heat, stirring constantly until chocolate is melted and mixture is smooth. Remove from heat.

Mix flour, baking soda and salt; set aside. Beat margarine and sugar in large bowl with electric mixer on medium speed until light and fluffy. Add egg yolks, 1 at a time, beating well after each addition. Stir in chocolate mixture and vanilla. Add flour mixture alternately with buttermilk, beating after each addition until smooth.

Beat egg whites in another large bowl with electric mixer on high speed until stiff peaks form. Gently stir into batter. Pour into prepared pans. Bake 30 minutes or until cake springs back when lightly touched in center. Immediately run spatula between cakes and sides of pans. Cool 15 minutes; remove from pans. Remove wax paper. Cool completely on wire racks.

Spread Coconut-Pecan Frosting between layers and over top of cake. Makes 12 servings.

COCONUT-PECAN FILLING AND FROSTING

Mix milk, sugar, margarine, egg yolks, and vanilla in large saucepan. Cook and stir on medium heat about 12 minutes or until thickened and golden brown (it took me about 25 minutes before the color and texture were right). Remove from heat. 

Stir in coconut and pecans. Beat until cool and of spreading consistency

Makes about 4 1/4 cups.

Peanut Butter Cupcakes

Peanut Butter Cupcakes

A Recipe from Better Homes & Gardens Dessert Cookbook (1968)

About the Recipe

When I volunteered to bring a dessert to an upcoming barbecue with friends, it should be noted that: 1. No one was surprised. And 2. I had no idea what I was going to bring. I have a friend with a tree-nut allergy and most mid-century baking requires some kind of tree nut. But then I found this little gem – all peanuts all the time.

These little guys turned out light and fluffy, and super peanut-buttery savory. I can see why the recipe says “Tops for a small-fry party –.” They were a total hit with kids and adults alike.

I used peanut-butter on a few of them, but most were topped with my own strawberry jelly buttercream. A kind of do-it yourself recipe that I made for the moment. I creamed together the butter and strawberry jam, then slowly added the powdered sugar until it was the right texture. And I did it grandma style – measuring with my heart.

Check out my step by step video for more tips and tricks below!

About the book

I know I’ve waxed poetic about this cookbook before. It’s one of my favorites. I can honestly say that it has a dessert for every occasion, and it’s never let me down. I noticed as I was going through my cookbooks, that I actually have a first printing of this book from 1960 that my grandma gave me (yes, that grandma). I’ll have to start experimenting to see how they differ.

If you grab this book, have faith in it! Go for one of the weird recipes, like this one. You’ll probably surprise yourself (and hopefully your enthusiastic taste-testers!).

The Recipe!

Ingredients:

1/2 cup peanut butter
1/3 cup shortening
1 t vanilla
1 1/2 cups brown sugar
2 eggs
2 cups sifted enriched rlour
2 t baking powder
1/2 t salt
3/4 c milk

Directions:

Cream together peanut butter, shortening and vanilla. Gradually add brown sugar, beating until light and fluffy. Add eggs one at a time, beating well after each. 

Sift together dry ingredients; add alternately with milk.

Place paper bake cups in muffin pans; fill 1/2 full. Bake in moderate oven (375*F) 20 minutes or until done.

“Frost” with peanut butter. Sift a small dot of confectioners’ sugar atop each.

(For Andi’s Strawberry Jam buttercream, cream 1/2 cup softened butter with about 1/2 cup strawberry jam. Add powdered sugar until the texture is right.)

Makes about 2 dozen.

The Video!

Enjoy this step-by-step video chock full of tips and tricks to make your peanut butter cupcakes come out magnificently!

Cocoa Meringues

Cocoa Meringues

A Recipe from Hershey’s Recipes (1949)

About the Recipe

As soon as this little advertising booklet arrived in the mail, I started reading it through. I’m not a big chocolate person, but I did grow up just outside of Hershey. As a result, I’m discerning in what chocolate recipes I’ll consider making. As soon as I saw the cocoa meringues, I knew it was one I wanted to try.

Vinegar does a ton of leg work in stabilizing generally delicate meringues. It’s one of the “family secrets” that people pass down from when grandma taught them how to make a good meringue. I was so excited to see it as part of this recipe. Hershey’s clearly wants you to be successful. I also did some quick research on what “Hershey’s Breakfast Cocoa” actually was. Long story short – it’s unsweetened cocoa powder. Grab whatever you have available, as long as it’s not hot cocoa mix.

Check out the video for some additional tips and tricks!

About the book

These little advertising booklets always get me. The recipes are usually so good (they want you to buy more, after all). Having grown up just outside of Hershey, I couldn’t resist snapping this one up when I saw it. There are a few Hershey’s booklets out there, as well as some reprints and updates. Beware the one from the 1970’s! It comes with that “low-fat, low-sugar, low-salt” mentality which just breaks so many of these amazing recipes.

The Recipe!

Ingredients:

3 egg whites
1 cup granulated sugar
1 teaspoon vanilla
1/2 Tablespoon vinegar
3 1/2 Tablespoons Hershey’s Breakfast Cocoa (any unsweetened cocoa powder will work here)

Directions:

Beat egg whites until very stiff. Add sugar gradually, beating constantly. Add vanilla and vinegar, continuing the beating. Then beat for 5 minutes.

Stir in cocoa.

Drop by spoonfuls on ungreased baking sheet which has been covered with waxed paper. Bake in a very slow oven (275 degrees F.) for 1/2 hour or until dry.

Makes about 3 dozen.

The Video!

Enjoy this step-by-step video chock full of tips and tricks to make your meringue cookies come out magnificently!

Soft Molasses Cookies

Soft Molasses Cookies

A Recipe from Hamilton Beach Food Mixer Instructions and Tested Recipes (1948)

About the Recipe

On a bright Mother’s Day morning, I was in a rush to get something in the oven. We were already starting to run late to a picnic and I wanted something easy to make and bring. This little Hamilton Beach booklet was sitting so invitingly on my counter, and something about a molasses cookie felt like exactly the right choice.

This recipe is designed to be made fully in your mixer – one bowl, one paddle, done! While usually I like to be a little more process oriented and precise, I decided to trust the process. The combination of buttermilk and baking soda created a fluffy, cake-like cookie. I substituted real maple syrup for the molasses without a problem. If you’re a ginger cookie fan, this easy recipe should suit you fine.

About the book

The Hamilton Beach booklet came from a close friend who saw it and grabbed it for me. It originally came with the Hamilton Beach Food Mixer and was created in collaboration with the College of Home Economics at Syracuse University. The goal, of course, being – use your mixer! I’ll let the rest of the booklet speak for itself…

The Recipe!

Ingredients:

2 cups sifted flour
1 t soda
1/2 t salt
1 1/2 t ginger
1/2 t cinnamon
1/2 t cloves
1/2 cup brown sugar, packed firmly
1 egg, unbeaten
1/3 cup molasses
1/3 cup buttermilk
1/2 cup shortening, soft

Directions:

*A quick note from your author: I’ve simplified this recipe for a modern mixer. Please see the image above (or message me) if you’d like the original

Preliminary: Preheat oven to baking temperature (350 degrees F). Have all ingredients at room temperature.

Sift into your mixer bowl flour, [baking] soda, salt, ginger, cinnamon, and cloves. Add in the rest of the ingredients (brown sugar, egg, molasses, buttermilk, and shortening). Beat at speed 3 for 3 minutes. Thoroughly mix all ingredients. Stop beater.

Baking: Drop by teaspoonfuls on an ungreased cookie sheet. Bake at 350 degrees F for 15-18 minutes.

Calumet Muffins

Calumet Muffins

A Recipe from The Calumet Book of Oven Triumphs! (1934)

About the Recipe

There’s nothing like a basic muffin recipe with loads of variations to have in one’s back pocket. This one is fabulous to have at the ready for whatever fun fillings you’d like to put inside. It’s more on the savory side than sweet, making it a perfect base recipe to play with.

A few quick notes about my variation:

  • Strawberries were on sale this week, so I used a cup of 1/4″ diced strawberries as the flavor profile. A quick toss in a little bit (less than a teaspoon) of flour kept them floating rather than sinking during baking.
  • If you’re going to use butter, make sure to let your milk and egg come to room temperature. This wouldn’t have been an issue in 1934, but certainly was in 2025. Oops. I ended up using vegetable oil, which worked just fine.
  • For the future, I’ll probably add a little bit of spice here. It’s a very plain muffin, which is great as a base, but not so exciting overall.

In the end, Maxx gave these a very enthusiastic thumbs up. Fresh out of the oven with a little bit of butter, they were absolutely divine.

About the book

I’ve had this little booklet lurking in my collection for awhile. The Calumet Baking Powder company put out this little booklet a few times over the 1930’s and the recipes are great. They’re easy to follow, and designed to be delicious. After all, the better the recipe, the more times you’ll make it. And the more times you make it, the more baking powder you’ll use. *wink!*

I love the tips and tricks to help make sure that the home baker is successful. It brings everything down to earth and makes it all so simple. Enjoy Calumet’s art deco design and tips for success:

The Recipe!

Ingredients:

2 cups sifted flour
2 t baking powder
2 T sugar
1/2 t salt
1 egg, well beaten
1 cup milk
4 T melted butter or other shortening
1 cup 1/4″diced strawberries (optional)

Directions:

Sift flour once, measure, add baking powder, sugar, and salt, and sift again (or combine all dry ingredients in a bowl and whisk to combine). Combine egg, milk, and shortening. Add to flour, beating only enough to dampen all flour. Fold in fruit if using. Bake in greased muffin pans in hot oven (425*F) 25 minutes, or until done. Makes 12 muffins.

Lemon Crisp

Lemon Crisp

A Recipe from Favorite Recipes of America Desserts (1968)

About the Recipe

If you’ve been with my blog for awhile, you’ll know that I love a recipe that tricks me into making something fancy that I probably wouldn’t have tried otherwise. This time, it was a beautiful lemon curd.

This recipe is magnificent. It’s tart and crunchy and absolutely perfect with the whipped cream on top. It would make a great make-ahead for a dinner party. I re-heated it in the warming drawer in my oven. The hubs and I even nibbled on it the next day. How was it? Still good.

One important note on this recipe to make sure it’s successful: Make sure that you have your mise en place set up and ready to go before you start working on the stove. You will not have time (or hands) to measure as you go on this one.

About the book

This book is one in a set of 5. I actually found a different book out of this set first (Casseroles. Don’t judge, I’m a fan). When I saw the full set on the shelf in my favorite antiques store, I had to have it.

The books are like a nationwide community cookbook. The submissions are clearly folks’ favorites. Typically they’re easy to make and every one I’ve tried has turned out well. They’re truly a look into kitchen favorites during this time period.

The Recipe!

Ingredients:

6 T butter or margarine
3/4 cup brown sugar
1 cup sifted flour
3/4 t salt (divided)
1/3 cup flaked coconut
3/4 cup finely crushed saltine crackers
3/4 cup white sugar
2 T cornstarch
1 cup hot water
2 beaten egg yolks
1/2 t grated lemon peel
1/2 cup lemon juice

Directions:

Cream butter and brown sugar; add flour, soda, 1/2 teaspoon salt, coconut and crackers. Press half crumb mixture into 8 x 8 x 2-inch baking pan. Bake at 350*F for 10 minutes. 

In saucepan combine white sugar, cornstarch and remaining salt; gradually stir in water. Bring to boil, stirring constantly; boil about 2 minutes. Remove from heat; stir small amount of hot mixture into egg yolks. Return to pan. Bring to a boil, stirring constantly; remove from heat. Stir in lemon peel and juice gradually. Pour over baked crust; top with remaining crumb mixture. 

Bake at 350*F for 30 minutes or until lightly browned. Top with whipped cream. Yield: 8 servings