Blueberry Butter Pastry Squares

Blueberry Butter Pastry Squares

A Recipe from Antoinette Pope School Cook-Book (1953)

About the Recipe

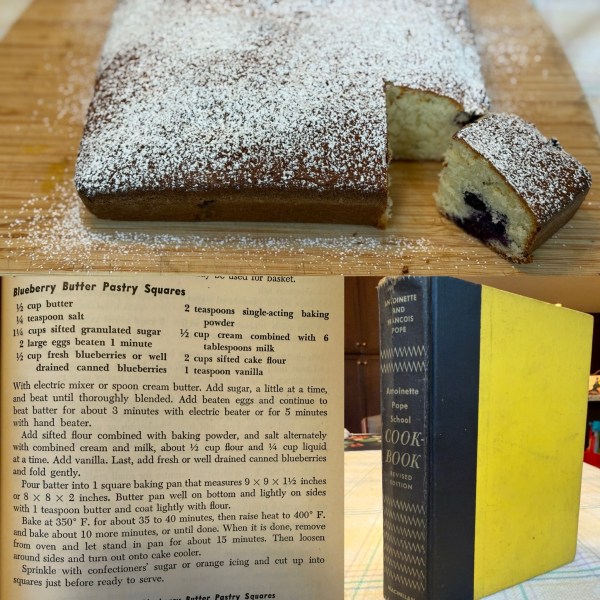
I can’t for the life of me figure out why this cake is called “pastry.” It doesn’t bake like a pastry. It doesn’t taste like a pastry. What it does taste like is buttery, cakey, blueberry goodness.

This recipe is super simple and elegant. The only quirky part of the recipe is the single-acting baking powder. I have two thoughts on that:

  1. If you truly want something single-acting as the recipe states, make your own by combining 1 part baking powder to 2 parts cream of tartar. That will create fast-acting reaction that’s dictated in the recipe. Be aware – you can’t let this batter sit once the single-action hits the liquid. If you do, prepare for a super dense cake.
  2. Don’t worry about it! Just use 2 teaspoons of double-acting baking powder, and you’ll be good to go.

I opted for the powdered sugar sprinkle, which was just perfect. The top of the cake is slightly crunchy, which worked well with the powdered sugar. The crunch comes from those last 10 minutes at 400*F. Don’t want the crunch? Leave the oven where it is!
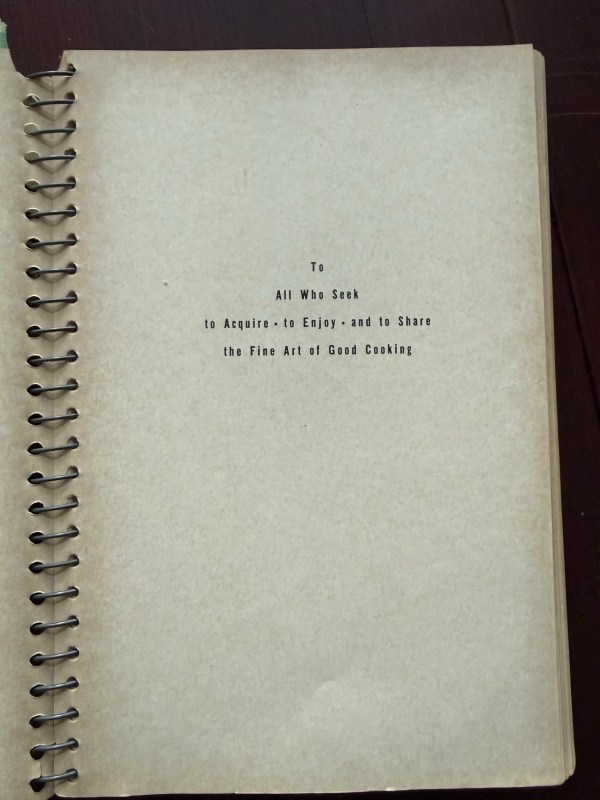
About the book

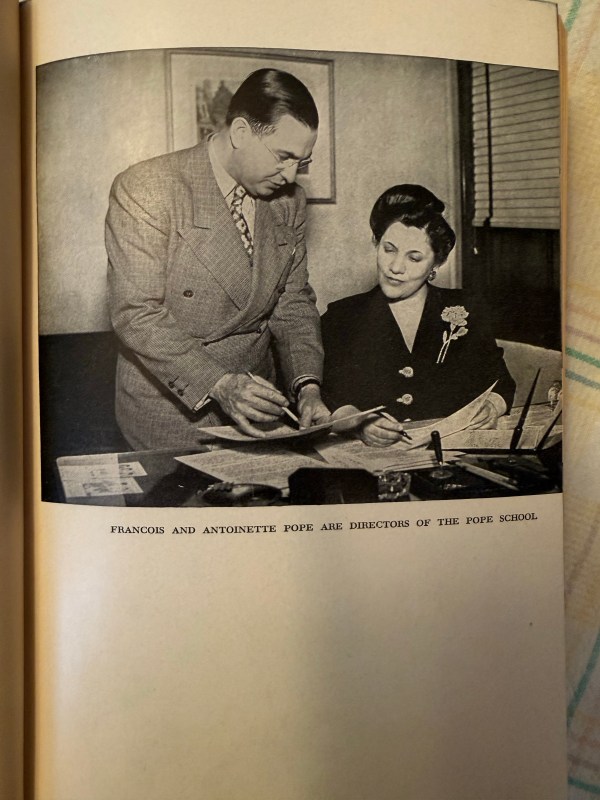
Everything you need to know about this book can be found in the dedication (photo below). This is such a lovingly crafted resource from the school. It’s clearly designed as an on-hand resource to have in your household and to guide continued success. Definitely worth picking up if you see it on a shelf.
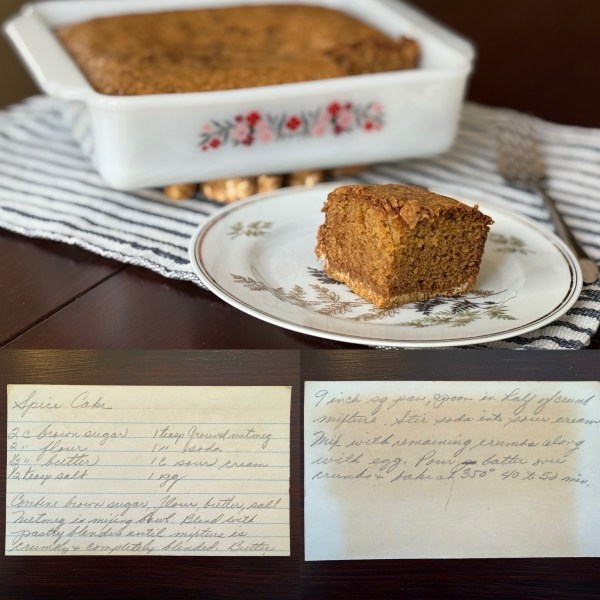
The Recipe!

Ingredients:

1/2 cup butter
1/4 t salt
1 1/4 cups sifted granulated sugar
2 large eggs beaten 1 minute
1/2 cup fresh blueberries or well drained canned blueberries
2 t single-acting baking powder
1/2 cup cream combined with 6 T milk
2 cups sifted cake flour
1 t vanilla

Directions:

With electric mixer or spoon cream butter. Add sugar, a little at a time, and beat until thoroughly blended. Add beaten eggs and continue to beat batter for about 3 minutes with electric beater or for 5 minutes with hand beater.

Add sifted flour combined with baking powder, and salt alternately with combined cream and milk, about 1/2 cup flour and 1/4 cup liquid at a time. Add vanilla. Last, add fresh or well drained canned blueberries and fold gently. 

Pour batter into 1 square baking pan that measures 9 x 9 x 1 1/2 inches or 8 x 8 x 2 inches. Butter pan well on bottom and lightly on sides with 1 teaspoon butter and coat lightly with flour. 

Bake at 350*F for about 35 or 40 minutes, then raise heat to 400*F and bake about 10 more minutes, or until done. When it is done, remove from oven and let stand in pan for about 15 minutes. Then loosen around sides and turn out onto cake cooler. 

Sprinkle with confectioners’ sugar or orange icing and cut up into squares just before ready to serve.

Spice Cake

Spice Cake

A Recipe from Florence Jones’ Recipe Box (19??)

About the Recipe

As happens sometimes, I woke up yesterday with a baking itch. I felt like I needed to try something new, but I had no idea what. I went to one of my cookbook shelves and saw my grandma’s recipe boxes. I’ve actually been a little bit wary of sifting through them. They look a mess. But actually, behind the last few shoved in the front, they’re meticulously organized. I found this little gem filed in the “Cakes” section.

When I looked at the method, I thought it couldn’t possibly make a cake. It’s strange to put an unpacked crumb on the bottom of a cake. And then stranger still to mix the crumb with sour cream, an egg, and some baking soda and call it a cake. But maybe worth a shot?

I messaged my dad to see if he remembered it. His response? “Yes, very good.” Okay then!

Reader, this cake is magnificent. It’s almost like an upside down coffee cake. The texture is light and fluffy from the chemical reaction of the sour cream (acid) and baking soda (base). The flavor, light on spices though it be for a spice cake, is divine. Dad suggested some icing on it. A cream cheese frosting would go well if you want to ice it, but it’s fine standing on its own.

No notes. Thanks, Grandma.

For more recipes from my family recipe box, check out my Recipes from Grandma page.

The Recipe!

Ingredients:

2 cups brown sugar
2 cups flour
1/2 cup butter
1/2 t salt
1 t ground nutmeg
1 t baking soda
1 cup sour cream
1 egg

Directions:

Combine brown sugar, flour, butter, salt, nutmeg in mixing bowl. Blend with pastry blender until mixture is crumbly and completely blended. 

Butter 9-inch square pan, spoon in half of crumb mixture. Stir soda into sour cream. Mix with remaining crumbs along with egg. 

Pour batter over crumbs and bake at 350*F 40-50 min.

Little Orange Layer Cake with Simple Orange Butter Frosting

Little Orange Layer Cake with Simple Orange Butter Frosting

A Recipe from Sunset Cook Book of Favorite Recipes (1952)

About the Recipe

When my friend asked us to join her and her family for New Year’s Eve this year, I had one ask: can I bring dessert?

A good party is always a good excuse to try a new recipe. When I saw this little orange layer cake, I knew it would be perfect for our intimate gathering. It also would compliment the brownies that I knew another friend was bringing. And reader – it absolutely was.

A few little learnings to help you make this cake successfully:

  • Make the cake in 7 or 8-inch layers. I did 8 inches, and I wish I had gone one size smaller.
  • The recipe says to bake for about 20 minutes. In my oven, which usually runs cold, the layers baked for about 18 minutes before I pulled them out. That was probably a minute too long.
  • I added fresh mandarin zest to the frosting. It was a little thing that made a massive difference in making the orange flavor pop.
  • This frosting is outrageous. Perfect for a super chocolatey fudge cake.
  • When you cut the butter into the frosting, take it right from the fridge. Cold butter is easier to cut with a pastry blender than warmer butter.

Other than that, this is a really simple, delicious cake. It was just the right amount of cake for our gathering of 10 adults. And decorating it was such fun. Happy New Year!

About the book

This book is a recent find at West End Antiques Mall in Richmond, VA. I don’t usually advocate for specific stores, but wow this one blew me away. A mid-century lover’s paradise!

The book itself is so well loved it’s falling apart at the seams. It’s a collection of recipes featured in Sunset Magazine. My favorite part is the dedication in the front. That’s me to a t! And I’m willing to bet that’s you as well (at least a little bit…).

The Recipe!

Ingredients:

Cake:
1 1/2 cups sifted cake flour
2 t baking powder
1/4 t salt
1/4 cup shortening
1/2 cup sugar
2 eggs, separated
1 t lemon extract
1/2 cup strained orange juice

Orange Butter Frosting:
4 T butter or margarine
2 cups sifted confectioners’ sugar
1 t vanilla
Hot orange juice (about 2 Tablespoons)
A little lemon extract and/or grated orange or lemon rind. 

Directions:

Cake:
Sift together the flour, baking powder, and salt.

Cream shortening and sugar together until fluffy; beat in well-beaten egg yolks, lemon extract, and orange juice; add sifted dry ingredients. Last, fold in stiffly beaten egg whites.

Pour into 2 greased layer pans (author’s note: I used 8″ pans, but 7″ pans will also work) and bake in a moderately hot oven (375*F) about 20 minutes (author’s note: about 17-18 minutes if you use 8″ layers). Remove from pans, cool on rack, and then spread with Orange Butter Frosting.

Orange Butter Frosting:
Blend butter thoroughly with sugar, using a pastry blender; add vanilla. Work in hot liquid and rind or extract until mixture is pliable and a little softer than you wish the finished frosting. Spread. 

The frosting becomes firm as it stands. This makes sufficient frosting for the tops and sides of 2 8-inch layers, the tops of 2 9-inch layers, or 2 dozen cup cakes.

Lemon-Cream Loaf

Lemon-Cream Loaf

A Recipe from The Pillsbury Family Cook Book (1963)

About the Recipe

It’s (I bought too many) lemon(s) week in my household, so we’re making a lemon cake! I wanted something that would have a little bit of mid-century flair, but come out delicious enough to share. And wow oh wow – did this take the cake. (Pun intended).

A few quick notes to make sure yours comes out well:

  • Don’t just grease your pans. Give them a butter and flour layer to make sure they come out. They’re a little bit sticky all around and that extra flour will make sure they come out of the pans.
  • I made a simple syrup out of the lemon juice and sugar at the end. Put them in a small saucepan on a low heat and stir continuously until the sugar is dissolved.
  • Painting the glaze on made the tops sticky and moist and lovely. 10/10 don’t miss out on that step.

The result here was a crumbly, fluffy lemon cake. Both loaves were gone within two days after sharing with some friends. Heed the note about freezing the second loaf, but I’d be surprised if you manage to hold on to it for that long.

About the book

I found this book in a small antique store just outside of Joshua Tree. My friends and I were headed out to a dessert adventure to look at the stars. The hubs and I requested a quick stop in this tiny town to wander and look at the shops. I’m so glad that we made the stop.

This book is so cute. Each design choice feels very carefully made and curated for the mid-century kitchen. A perfect little time capsule of hosting in the ’60’s. Enjoy!

The Recipe!

Ingredients:
2 1/4 cups sifted all purpose flour
1 T baking powder
1 t salt
1 2/3 cups sugar, split
1/2 cup shortening
2 eggs
1 cup milk
8-ounce package cream cheese, cut into 1/4-inch cubes, softened
1/2 cup chopped walnuts
2 T grated lemon rind 
1/4 cup lemon juice

Directions:

Grease and flour two 9 x 5 x 3-inch pans. Sift flour with baking powder and salt. Gradually add 1 1/3 cups sugar to shortening in large mixing bowl; cream at high speed of mixer until light and fluffy.

At medium speed blend in eggs, beating well. At low speed add sifted dry ingredients alternately with milk, beginning and ending with dry ingredients. Blend well after each addition. 

Fold in cream cheese, walnuts and lemon rind. Pour batter into pans.

Bake at 375*F for 50 to 55 minutes, until golden brown.

Combine 1/3 cup sugar and lemon juice (hint from Andi: heat this mixture over low heat, stirring constantly until the sugar is dissolved); brush mixture over hot loaves. Cool 30 minutes. Remove from pans. Cool completely before slicing.

TIP: Freeze the second cake in meal-size amounts for a quick dessert. Lemon Cream Loaf is good as a base for Baked Alaska.

German Sweet Chocolate Cake

German Sweet Chocolate Cake

A Recipe from Florence Jones’ Recipe Box (19??)

About the Recipe

There are a few core memories that pop up when I think about going to Grandma in Washington’s house growing up. There are the walls covered with family photographs. There are the artifacts from her travels all over the world. But more than almost anything else, there’s German Chocolate Cake.

Every time we had a family celebration or holiday, especially one that had to do with my father, my grandma made a German Chocolate Cake. She made hers with two layers. Take a minute and check out the recipe. 3 layers. There are 3 layers in that recipe. We endlessly gave her a hard time about it. She laughed it off with her usual “oh, shit!” knowing that we were going to love the cake no matter the number of layers.

Indeed, this was the cake that she was best known for. In all the years that she made it, I kept asking for the recipe. Her answer was always no. “It came off the back of the box, Andi! It’s nothing special.”

My grandma passed away on September 14, 2025 at the age of 94. A few years ago, she gifted me her recipe boxes and her cookbooks, as well as most of her pans. When I received the news of her passing, the first thing I wanted to do was bake this cake. I found the recipe card stuffed in one of her recipe boxes. And y’know – it was right off the back of the box!

This cake is a labor of love. It’s a little bit tricky, and the icing takes an awfully long time to get just right, but it’s worth it.

Some tips from my time making it and all the years of Grandma serving it:

  • The layers freeze exceptionally well. She always had a few spare layers and frosting waiting in the freezer. Let everything thaw in the refrigerator overnight, and you’re good to go.
  • The icing takes awhile to get just right. I stirred for about 25 minutes until I got the right color and thickness.
  • For your eggs: Separate them when they’re cold, then let them come to room temperature before baking.
  • I used butter; Grandma used margarine (so that the cake is kosher pareve). Both work.
  • There are enough egg whites leftover from the icing to make a delicious meringue.
  • Always double the icing. A thick layer in the cake serves well, and people always want to nibble the extra.

For more recipes from my family recipe box, check out my Recipes from Grandma page.

About the book

A quick note to say that the recipe on the back of the current Baker’s German Chocolate is slightly different than this one. I didn’t try that one, so I can’t speak to it.

The Recipe!

Ingredients:

1 package (4 ounces) Baker’s German’s Sweet Chocolate
1/2 cup water
2 cups flour
1 t baking soda
1/4 t salt
1 cup (2 sticks) margarine or butter, softened
2 cups sugar
4 egg yolks
1 t vanilla
2 cup buttermilk
4 egg whites

COCONUT-PECAN FILLING AND FROSTING:
1 can (12 ounces) evaporated milk
1 1/2 cups sugar
3/4 cup (1 1/2 sticks) margarine or butter
4 egg yolks, slightly beaten
1 1/2 t vanilla
1 package (7 ounces) Baker’s Angel Flake Coconut (about 2 2/3 cups)
1 1/2 cups chopped pecans

Directions:

Heat oven to 350*F. Line bottoms of 3 9-inch round cake pans with wax or parchment paper.

Heat chocolate and water in heavy 1-quart saucepan on very low heat, stirring constantly until chocolate is melted and mixture is smooth. Remove from heat.

Mix flour, baking soda and salt; set aside. Beat margarine and sugar in large bowl with electric mixer on medium speed until light and fluffy. Add egg yolks, 1 at a time, beating well after each addition. Stir in chocolate mixture and vanilla. Add flour mixture alternately with buttermilk, beating after each addition until smooth.

Beat egg whites in another large bowl with electric mixer on high speed until stiff peaks form. Gently stir into batter. Pour into prepared pans. Bake 30 minutes or until cake springs back when lightly touched in center. Immediately run spatula between cakes and sides of pans. Cool 15 minutes; remove from pans. Remove wax paper. Cool completely on wire racks.

Spread Coconut-Pecan Frosting between layers and over top of cake. Makes 12 servings.

COCONUT-PECAN FILLING AND FROSTING

Mix milk, sugar, margarine, egg yolks, and vanilla in large saucepan. Cook and stir on medium heat about 12 minutes or until thickened and golden brown (it took me about 25 minutes before the color and texture were right). Remove from heat. 

Stir in coconut and pecans. Beat until cool and of spreading consistency

Makes about 4 1/4 cups.

Peanut Butter Cupcakes

Peanut Butter Cupcakes

A Recipe from Better Homes & Gardens Dessert Cookbook (1968)

About the Recipe

When I volunteered to bring a dessert to an upcoming barbecue with friends, it should be noted that: 1. No one was surprised. And 2. I had no idea what I was going to bring. I have a friend with a tree-nut allergy and most mid-century baking requires some kind of tree nut. But then I found this little gem – all peanuts all the time.

These little guys turned out light and fluffy, and super peanut-buttery savory. I can see why the recipe says “Tops for a small-fry party –.” They were a total hit with kids and adults alike.

I used peanut-butter on a few of them, but most were topped with my own strawberry jelly buttercream. A kind of do-it yourself recipe that I made for the moment. I creamed together the butter and strawberry jam, then slowly added the powdered sugar until it was the right texture. And I did it grandma style – measuring with my heart.

Check out my step by step video for more tips and tricks below!

About the book

I know I’ve waxed poetic about this cookbook before. It’s one of my favorites. I can honestly say that it has a dessert for every occasion, and it’s never let me down. I noticed as I was going through my cookbooks, that I actually have a first printing of this book from 1960 that my grandma gave me (yes, that grandma). I’ll have to start experimenting to see how they differ.

If you grab this book, have faith in it! Go for one of the weird recipes, like this one. You’ll probably surprise yourself (and hopefully your enthusiastic taste-testers!).

The Recipe!

Ingredients:

1/2 cup peanut butter
1/3 cup shortening
1 t vanilla
1 1/2 cups brown sugar
2 eggs
2 cups sifted enriched rlour
2 t baking powder
1/2 t salt
3/4 c milk

Directions:

Cream together peanut butter, shortening and vanilla. Gradually add brown sugar, beating until light and fluffy. Add eggs one at a time, beating well after each. 

Sift together dry ingredients; add alternately with milk.

Place paper bake cups in muffin pans; fill 1/2 full. Bake in moderate oven (375*F) 20 minutes or until done.

“Frost” with peanut butter. Sift a small dot of confectioners’ sugar atop each.

(For Andi’s Strawberry Jam buttercream, cream 1/2 cup softened butter with about 1/2 cup strawberry jam. Add powdered sugar until the texture is right.)

Makes about 2 dozen.

The Video!

Enjoy this step-by-step video chock full of tips and tricks to make your peanut butter cupcakes come out magnificently!

Fresh Blueberry Cake

Fresh Blueberry Cake

A Recipe from Better Cooking Library Dessert Cook Book (1964)

About the Recipe

I was asked to bring dessert to a small gathering of friends. They’re the best kind – ones who will try just about anything you put in front of them. What an opportunity to try a new dessert! When I saw this blueberry cake (from the Blueberry Institute, of course!) I knew I had to give it a try.

I’ve tried a few cakes like this before, where you make the batter and then the fruit goes on top. The cake kind of bakes around the fruit and it sits kind of on top once the cake is done. This was a little bit more complex, but I don’t think it needs to be.

A few tips and changes you might think about when you give this one a try:

  • Food processing the butter, flour, and sugar will make for a more even batter. I don’t have regrets about cutting the butter in by hand, but in the future I’ll go the food processor route for sure.
  • The cake was a little bit bland. A little extra seasoning mixed in with the sugar and flour after you separate out the bit for the crumb would go a long way. I recommend trying a good pie spice mix, or maybe a touch of nutmeg and allspice.
  • I didn’t have a spring-form pan readily available, so I used a pan that my grandma gave me where the bottom separates from the top. It worked just fine. If you’re having trouble getting the cake out of the pan give it a few minutes to cool. It will shrink a little bit away from the sides and you’ll have no trouble at all.
  • The recipe references a “dough” that you can push up the sides of the pan. I’m not sure who wrote that or what they did, but this is most definitely a batter and not a dough. Feel free to push to the sides, but know that it doesn’t really work and your cake will be just fine.

All in all, this was a solid dessert to bring to the gathering. A scoop of ice cream or a warm cream sauce will go a long way in finishing it off and making it the perfect dish!

About the book

I’ve been looking at this book for awhile trying to find the right moment to pull it out. While it lacks the mid-century illustrations that I love about books in this time period, the photos are delightful. It seems to be a mish-mash of recipes from various growers and associations in the United States. This recipe was from the Blueberry Institute. There’s one from banana growers and dairy farmers and all kinds of food associations I didn’t even know existed. A pretty cool book indeed!

The Recipe!

Ingredients:

2 cups fresh cultivated blueberries
2 1/4 cups flour
1 cup sugar
4 T butter
2 eggs
3/4 cup milk
2 t baking powder
1 T butter
1 t cinnamon

Directions:

Wash cultivated blueberries and spread on paper toweling. Sprinkle with a little sugar and let dry while making batter.

In a bowl, cut butter into flour and sugar as if for a pie crust. When thoroughly mixed, take out 3/4 cup of the crumb mixture and set aside. To remainder in bowl, add eggs, milk, baking powder and vanilla. Beat thoroughly until all sugar is assimilated and batter is not grainy.

Pour batter into buttered 9-inch spring pan and work up around sides of pan to form a lining of dough. Place blueberries into hollow of batter.

To the reserved 3/4 cup of crumbs, add 1 tablespoon butter and cinnamon and work with fingers to make crumbly. Sprinkle crumbs over top of berries. 

Bake in a very hot oven at 450*F for 5 minutes. Reduce heat to 350*F and continue baking for 20 minutes more. Serve warm or cold. Makes 8 large servings.

The Video!

For the first time, here’s a video to help guide you as you cook. I hope you enjoy it!

Honey Cake

Honey Cake

A Recipe from The Golden Jubilee Recipe Book (1959)

About the Recipe

Tonight (September 6, 2021) at sundown, is the start of Rosh Hashana, the Jewish holiday celebrating the new year. It’s one of my favorite holidays. It means time with family, getting a little bit of wine even when it wasn’t supposed to be allowed, and of course – delicious food. One of the traditional dishes to celebrate is honey cake, so of course I went looking for a good one!

This one is delicious! Light and fluffy, and just the right amount of sticky sweet for a sweet new year. It’s already bubbling and rising by the time the batter goes into the pan, which is exactly what one looks for in a great honey cake. It’s got a very traditional flavor to it, without all the density that sometimes comes along.

Two quick changes – throw this one in a 9×13 pan. Otherwise you’ll end up with batter everywhere! And I went a little bit lighter on the added sugar, maybe a 1/4 cup less. I find the balance is a bit better.

L’shana tovah! And happy 5782!

About the book

This book is the gift that keeps on giving. As it turns out, this little B’nai B’rith book has filtered down all over the New York metro area. A friend of mine found the noodle kugel recipe that I shared previously and noted that it was the same one she used in childhood. The dishes in it seem to be all of the regional favorites of Jewish New York, and I’m not even a little bit upset about it.

On a more personal note, one of the ladies who submitted a “Similar recipe” above is Rose Dubinsky. My paternal grandmother was a Dubinsky. Her family came over through Ellis Island and lived in New York for awhile before relocating to the Baltimore/DC area. I can’t help but wonder if an old family recipe has just come back around to find me this time around…

The Recipe!

Ingredients:

4 eggs
2 cups sugar
1 lb. honey
1 t baking soda
1 cup strong coffee
4 cups flour
2 t baking powder
Juice of 1/2 lemon
Juice of 1/2 orange
1/4 cup almonds

Directions:

Mix eggs and sugar together; add honey.

Dissolve soda with a little hot water and add.

Sift flour and baking powder; add alternately with coffee; add the juices; stir in almonds.

Line 8″ x 10″ (I used a 9×13 and barely had enough room) baking dish with foil; pour in batter and bake in 350*F oven one hour.

Blueberry Buckle

Blueberry Buckle

A Recipe from the Mary Margaret McBride Encyclopedia of Cooking (1959)

About the Recipe

When a friend invited me over for dinner at the tail end of berry season, and with a fridge full of blueberries, I happily volunteered – “I’ve got dessert!” This quick and easy little cake was the perfect cap to a dinner with friends. Any berry could be easily substituted for the blueberries, and you could even go full on triple berry if you’re feeling saucy. Any way it’s done, this is a great last-minute-I’ve-got-the-dessert recipe.

While we’re here though – you might be asking yourself, what is a “buckle?” Simply put, a buckle is much like a coffee cake. It’s traditionally got fruit in the batter and a crumb topping, with a fairly high batter to fruit ratio. It’s called a buckle because the weight of the crumb makes the cake do just that when it comes out of the oven – buckle!

About the Book

Part of my weekly routine since I started collecting cookbooks is to sit down with a small stack of them as I’m making my grocery list, and picking out one or two to try over the course of the week. While that’s fantastic for finding new things to try for dinner, it’s not great when I’m seeking something specific (like, say, blueberry desserts). For the specific ask, there’s only one resource I turn to – the Mary Margaret McBride. I’ll spare more waxing poetic about this amazing book for now, but suffice it to say that if you’re looking for a gift for someone new to the kitchen this is the perfect fit.

Check out more recipes in the Mary Margaret McBride Collection here!

About the Glassware

The baking dish is a new acquisition of mine from a road trip I took with my husband earlier this year. It’s a Fire King by Anchor Hocking with a Primrose pattern. This pattern was produced in the early ’60’s and when I saw it, I had to add it to the collection. I rarely see this pattern in my usual antique/vintage haunts and it’s just so cute. It felt like the perfect mid-century dish for this mid-century dish.

The Recipe!

Ingredients:

Crumb Topping:
1/2 cup sugar
1/3 cup sifted enriched flour
1/2 t cinnamon
3 T soft butter or margarine

Batter:
1/4 cup soft butter or margarine
3/4 cup sugar
1 egg
1/2 cup milk
1 1/2 cups sifted enriched flour
2 t baking powder
1/2 t salt
1 14-oz can blueberries, drained OR 1 pint fresh blueberries

Directions:

Crumb Topping:
Measure sugar, flour, and cinnamon into small bowl. Mix well.

Add butter or margarine and cut in with fork or pastry blender until mixture is consistency of crumbs

Batter:
Stir butter or margarine until creamy. Add sugar, gradually, mixing until creamy. Beat in egg. Add milk.

Sift together flour, baking powder, and salt. Stir into butter or margarine mixture, stirring until smooth. Gently fold in blueberries.

Spread batter into well buttered pan, 8×8 inches.

Sprinkle with crumb topping. Bake in moderate oven (375*F.) 45-50 minutes.

Orange Bowl Coffee Cake

Orange Bowl Coffee Cake

A Recipe from 100 New Bake-Off Recipes from Pillsbury’s 16th Grand National (1965)

About the Recipe

Sometimes a dish comes out of the oven, and you show your little brother how to properly flip a baked dish, and as he lifts the casserole dish off, you’re crossing your fingers that it comes out properly – and then it comes cleanly out of the dish with a slow waterfall of caramel-y goodness and all you can think is – WOW. Yeah. This is that recipe.

“Coffee cake” is a little bit of a misnomer here, as this is far from the crumbly baked good you’re probably thinking of. This is more like a cinnamon bun loaf with hints of orange caramel; more suitable for pulling apart than for slicing.

I’ll admit, this came out looking a little bit different than in the photo that lives in the book (no, I’m not going to put it here). Be sure to let the orange juice and eggs come to room temperature so as not to make the yeast angry and you’ll be good to go. Even through my yeast flub, this dish gets the little brother seal of approval:

For more recipes in the Pillsbury Challenge, click here!

About the book

Pillsbury really goes the extra mile on the advertising front in this booklet. Not only are they pushing the new “Pillsbury Family Cookbook” (YOURS FREE for a Ten-Day Try Out!), but they dedicate the first few pages to new Instant Blending flour – “This gay new way to put a cake together!” Divine!

The Recipe!

Ingredients:

2 packets active dry yeast or 2 cakes compressed yeast
1/4 cup warm water
1/4 cup sugar
3/4 cup butter
1 1/2 t salt
1/2 cup milk, scalded
2 eggs
1/4 cup orange juice
3 1/2 – 4 cups flour
1 cup granulated or brown sugar
2 T grated orange rind
1 cup chopped walnuts

Directions:

Soften yeast in warm water. Combine in mixing bowl 1/4 cup sugar, 1/4 cup soft butter, salt and milk. Cool to lukewarm. Stir in eggs, orange juice and yeast. Gradually add flour to form a stiff dough. Knead on floured surface until smooth and satiny, 3-5 minutes. Place in greased bowl, turning dough to grease all sides. Cover; let rise in warm place until light and doubled, about 1 hour.

Cream 1/2 cup butter. Add 1 cup sugar and orange rind. Roll out half of dough on floured surface to a 12×8-inch rectangle. Spread with half of filling; sprinkle with 1/2 cup walnuts. Starting with 120inch side, roll jelly-roll fashion. Cut into twelve 1-inch slices. Arrange 1 inch apart on bottom and sides of well-greased 2-quart casserole or mixing bowl. Place remaining slices in center. Repeat with remaining slices in center. Repeat with remaining dough. Cover; let rise in a warm place until light and doubled, about 45 minutes. Bake at 350*F for 30-35 minutes until golden brown. Invert immediately onto cooling rack.

Variation: For orange-cinnamon coffee cake, add 1 teaspoon cinnamon to filling. If desired, drizzle warm bread with a vanilla glaze.

.